

How To Install Camera Raw Presets
- How To Save A New Custom Preset In Adobe Camera Raw and Adobe Bridge
- How To Install Adobe Photographic camera Raw & Span Presets
How To Relieve A New Custom Preset In Adobe Camera Raw and Adobe Bridge
If you are a Premium member, you can access our newly updated ACR presets here. If you are looking to purchase the Camera Raw Presets CC, click here!
Whether you have created your own custom preset from scratch, or have combined a number of different existing presets to create a highly unique new expect, you may want to create a new custom preset.
Start and foremost, apply the desired edits to your image. Information technology is strongly recommended to work on creating a preset using many different images, instead of merely one, so that the preset is well-balanced and works well on a variety of images.
To test the preset settings out on multiple images, before saving the edits as a new preset, try pasting or synchronizing the edits to other, similar images, and encounter how the edits look. If everything seems to wait skilful, so it is time to relieve a new preset!
Save The New Custom Preset
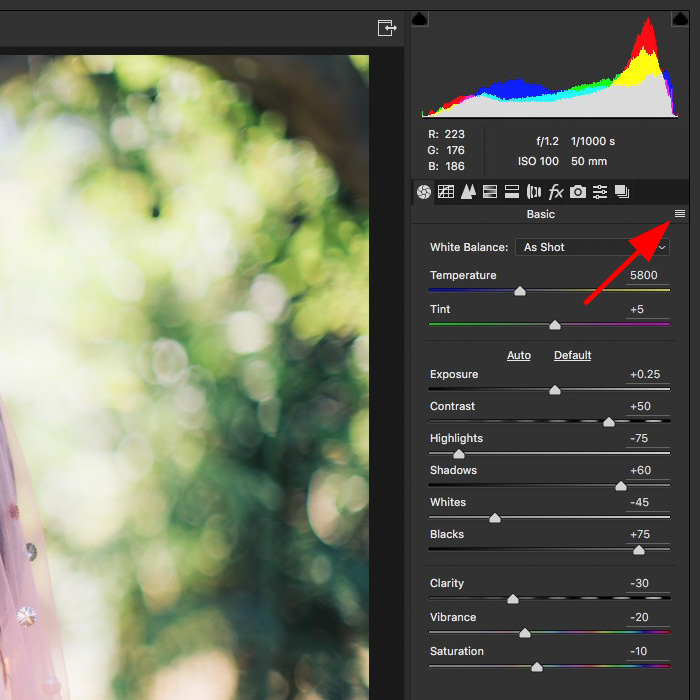
 Click on the drop-down menu icon in the upper correct of the Editing Tabs, and click "Salvage Settings"

Cull Which Settings To Put Into The Preset
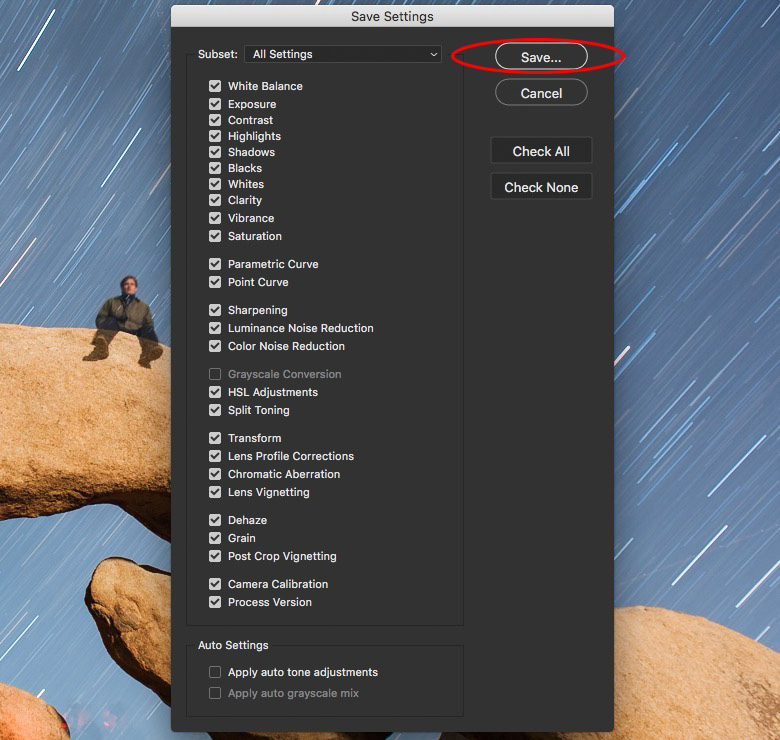
Before clicking "Relieve", consider un-checking certain settings that simply don't matter to the look y'all're trying to reach, or aren't going to always be the same.
For case, White Balance and Exposure, in particular, are two settings that might vary dramatically from image to image, even when yous want to utilize the same preset on daylight images versus low-light indoor images.
And so, un-check the boxes for White Residual, Exposure, and whatsoever others that you wish to avoid carrying over into the preset, and then click "Salve" to continue.

Name And Save The New Adobe Camera Raw (ACR) Preset
In guild to ensure that the presets show upwards at the pinnacle of the list of presets, instead of the very lesser, always remember to E'er begin custom preset names with the numbers "00-05" so that they show up in the right place. Additional numbers tin be added afterward this number, if additional organisation is required. For instance, "00-05-01".
That'southward all at that place is to it! Enjoy accessing this new preset with just a single click. You can also check out Five Tips For Bridge CS6 and Adobe Camera Raw.
How To Install Adobe Photographic camera Raw & Span Presets
Notation: These installation instructions themselves are accurate for Adobe Bridge & Photoshop CC, as well every bit CS6, CS5, and some older versions. However, these item Photographic camera Raw Presets CC from SLR Lounge are only uniform with Creative Deject and CS6. These presets are not compatible with CS5 and older!
If you are a Premium member, you can access our newly updated ACR presets hither. If you lot are looking to purchase the Photographic camera Raw Presets CC, click hither!
What you receive when you download the SLR Lounge Preset System for Adobe Photographic camera Raw is a zip file. On both PC and Apple computers, you should be able to un-zip the principal download file by only double-clicking on it. If this does not work, try right-clicking the .Zip file and look for an choice that says "unzip" or "excerpt".
Within the unzipped folder volition be the important folders that actually incorporate the presets themselves, (named "Settings" and "LocalCorrections") plus the instructions on how to install the presets. (The same every bit what you are reading here, just in example you need the instructions when offline.)


The 2 folders "LocalCorrections" and "Settings" stand for to two folders that are already on your figurer, in the preferences for Adobe Camera Raw.
Unfortunately, on both Windows and Apple computers the location of this destination folder is hidden by default. To reveal them, you lot will accept to either change certain preferences in Windows Explorer or Apple'due south Finder, …or "play a joke on" Adobe Camera Raw into revealing the folder.
How To Find the "Settings" Folder For Adobe Camera Raw Presets
The easiest way to ensure that you copy ACR / Bridge preset files to the correct place is to utilize Camera Raw itself to reveal the folder by creating a new preset in ACR.
Step 1.) Open up Adobe Bridge, and double-click on a raw (NEF, ARW, CR2) file to open information technology in the ACR interface of Bridge or Photoshop.
Footstep two.) Click on the menu icon inside the ACR Window, and select "Save Settings…"


Step 3.) A preset settings menu volition announced. Since this is a "dummy" preset that nosotros are only using to flim-flam Adobe into revealing its preset folder, don't worry nigh these checkboxes, merely click "Salvage".
Stride iv.) The next window is the important 1! This window volition let you save the preset yous merely created every bit an XMP file, in the correct folder where it will exist bachelor for future employ. This folder is labeled Settings.

This is the binder that is hidden past default, however you can use this Save Settings window to "bookmark" the folder.
On a Mac, simply drag the Settings binder to the top of the sidebar.

(On Apple computers)
On a PC, look for a "Quick Admission" section in the Explorer interface, and drag the Settings Binder until yous run across "Pin to Quick Access".

(On PC Computers)
Step 5.) Afterward you lot've saved the Settings folder in this interface of Apple tree Finder or Windows Explorer, click "abolish" and exit Photoshop and Span. Next, open Explorer or Finder itself, and await in the sidebar for the Settings folder, in the Favorites or Quick access department. (If it does not announced, try restarting your figurer and looking again.)
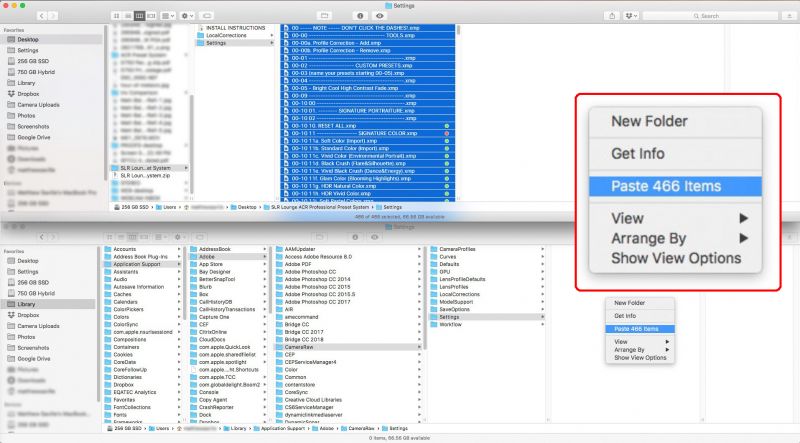
Side by side, open some other window in Explorer or Finder that shows the Settings and LocalCorrections folders which comprise the SLR Lounge Presets which y'all downloaded. Drag and drop (or re-create) all of the .XMP files inside that Settings folder, and motion / paste them into the Settings folder which yous favorited.
Step 6.) Open Bridge or Camera Raw up again, and in the Presets tab yous will encounter all of the SLR Lounge Presets!

Installing Local Adjustment Presets in ACR & Bridge
To install the Local Adjustment Presets, (brushes, graduated filters, etc.) y'all must find the folder named "LocalCorrections" which is in the aforementioned parent folder as the Settings folder.
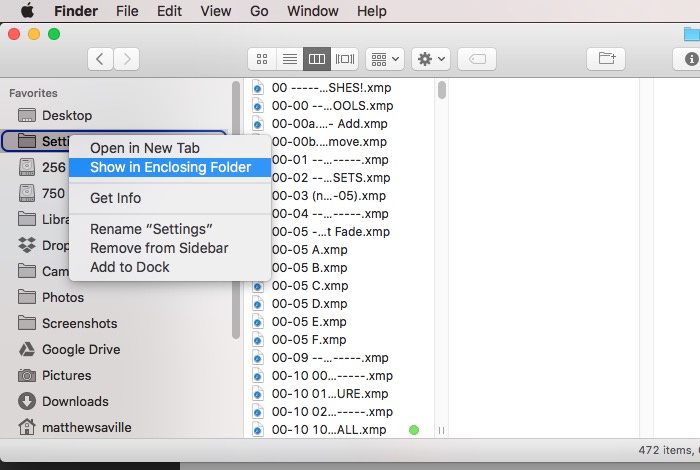
On Apple tree computers, correct-click on the Settings binder that you favorited, and click "Testify In Enclosing Binder". This will reveal the entire folder structure. In the CameraRaw binder, look for a folder named LocalCorrections, and copy+paste in the XMP preset files from the similar-titled LocalCorrections folder that was downloaded from SLR Lounge.
In Apple Finder, or Windows Explorer, expect for the "path bar", and click on the CameraRaw folder which is the parent folder for the Settings binder that you already bookmarked. In this CameraRaw folder, you lot will observe a folder named LocalCorrections. Re-create and paste in the XMP preset files from the similar-titled LocalCorrections binder that was downloaded from SLR Lounge.
(If y'all cannot see a folder "path bar", on either a Mac or a PC, select "View" in the master menu, then "View/Show Path Bar".)
Again, close and re-open Adobe Bridge or Photoshop, and you should now be able to see all the SLR Lounge Presets! Annotation: the brush presets exercise non have their own tab, like the overall (global) presets do. To access brush presets, simply select the menu push on the right-hand tool console in ACR:

Option #2 – Finding the CameraRaw & Settings Folders Manually
If the in a higher place method of revealing and bookmarking hidden folders does not work, here is the complete folder path to notice where to move / copy the XMP files to:
On a Mac:
Users > (Username) > Library > Application Support > Adobe > CameraRaw

Annotation: There are other "Library" folders on Mac computers; you lot MUST use this specific ane! This Library binder is hidden by default, and revealing the binder may be unlike depending on which version of OSX you have. Refer to Apple support on "how to reveal hidden Library binder on a Mac".
On a PC:
Users > (Username) > AppData > Roaming > Adobe > CameraRaw

On a PC, the folder that is hidden from view by default is named "AppData", and information technology is a petty easier to reveal, peculiarly in newer Windows computers. Simply look in the "Show/Hibernate" section of the View settings tab at the top of Windows Explorer, and check the box for "Hidden Items":

Back up Your Preset Files
Make sure you go along a backup of the zip file of the original SLR Lounge presets. It is a small file, then Dropbox or similar is a keen identify to constrict them abroad safely.
The same goes for creating your ain presets, or personalizing of the presets that you purchased- if you put a lot of time into it, back it upward!
Do Not Click on the "Name Tag" Presets
Yous may have noticed that some of the presets are entirely named with numbers and dashes, or the name of a category of presets. We had to create these "place holder" or "name tag" presets considering unfortunately unlike Lightroom, Adobe Span does not permit you to organize presets into sub-folders inside the main "Settings" preset folder.

(If you lot do accidentally click on one of these presets, nothing volition happen.)

Source: https://www.slrlounge.com/adobe-camera-raw-presets-for-cc/
Posted by: boucherleopragues.blogspot.com
0 Response to "How To Install Camera Raw Presets"
Post a Comment